Are you confused about process of configuration and usage of Call Tracker for Bitrix24 CRM?
 It is much easier than it looks! Just take a look at this brief guide:
1. The first and foremost is to set up the application correctly. To do that a user have to open ‘Configuration’ and to enter the Webhook URL. The instruction is given below the corresponding field: you need to log in to your Bitrix24 website, choose Applications -> Webhooks -> Add webhook (Inbound webhook), tick CRM, Drive (disk) and Tasks from the Access Permissions and click Save. In the next window you will get a Webhook URL(Example https://yourdomain.bitrix24.com /rest/1/9bjbweb983bjbv/prifile). Please copy your own Webhook URL(NOT the one from example) and paste it into the corresponding field.
2. Having the application configured and connected to the CRM you have to mind that the necessary condition for app to work is to be always turned on, so the service must be active.
3. Even if you have not received any calls, you can already set up rules for call tracking. Open ‘Rules’ and press the “+” button in right bottom corner, you will see a pop-up where you only need to enter the phone number and chose the rule for it.
4. The application can record your conversations but you have to configure this option by going to Configuration and scrolling down to ‘How to save calls into the CRM’. You can turn on call recording function there and configure cloud and storage.
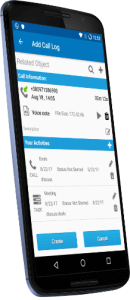
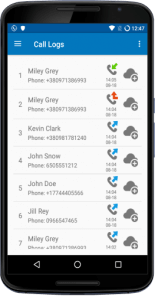
5. That’s it! You are ready to save calls to your CRM! Everything starts when you finish the conversation: you see a pop-up where you can opt for call saving. The next window opened is ‘Add Call Log’ where you can do the main part. That is to say you can:
- find or create a Contact or Lead in your Bitrix24 account and save it to your phone contacts;
- see and listen to call recording;
- add voice and text note;
- add activities such as Call and Task (Adding a call or a task you will be able to name it, set the date, time and status; also you can set the reminder for a new call).
6. Having all the info chosen and created you just press ‘Create’. Done! You have saved all the information to your CRM account! Now you can use it in your business intentions!
As you can see it is not so difficult as it might look. So it’s high time for you to download the Call Tracker for Bitrix24 CRM and enjoy the results!
Leave a Reply
You must be logged in to post a comment.